![]() Broadcom Advanced Control Suite 3 Overview
Broadcom Advanced Control Suite 3 Overview
![]() Starting Broadcom Advanced Control Suite 3
Starting Broadcom Advanced Control Suite 3
![]() Using Broadcom Advanced Control Suite 3
Using Broadcom Advanced Control Suite 3
Broadcom Advanced Control Suite 3 (BACS 3) is an integrated utility that provides useful information about each network adapter that is installed in your system. BACS 3 also enables you to perform detailed tests, diagnostics, and analyses on each adapter, as well as to view and modify property values and view traffic statistics for each adapter.
In Control Panel, click Broadcom Control Suite 3.
Microsoft .NET Framework 2.0 includes the runtime and associated files needed to run BACS 3, and must be installed on your system in order for BACS 3 to operate. For information on the minimum and recommended .NET Framework versions for your operating system, see Table 1.
 NOTES:
|
Operating System
|
Minimum Required
|
Recommended
|
||
|---|---|---|---|---|
|
Version
|
How to Obtain
|
Version
|
How to Obtain
|
|
|
Windows XP
|
.NET 2.0
|
Download from http://windowsupdate.microsoft.com/
|
.NET 2.0 SP1
|
Download from http://windowsupdate.microsoft.com/
|
|
Windows Vista
|
.NET 2.0
|
Included in .NET 3.0, which is included during OS installation
|
.NET 2.0 SP1
|
Download from http://windowsupdate.microsoft.com/
|
Start BACS 3. Click the tab that provides the information of interest or from which to perform a desired test, diagnostic, analysis, or set adapter properties.
BACS 3 features a context-sensitive interface. When an item is selected in the Explorer View, such as an adapter, driver, team, or VLAN, the interface changes to display the information and options available for the selected item. Certain tabs, menu options, and device information are only available based on the types of devices installed or the item selected in the interface.
The Device Management pane lists the devices that can be viewed, analyzed, tested, or adjusted by BACS 3. When an item is selected in the Device Management pane, the tabs showing the information and options that are available for the item appear. Because the BACS 3 interface is context-sensitive, only the information that applies to the selected item can be viewed or adjusted.
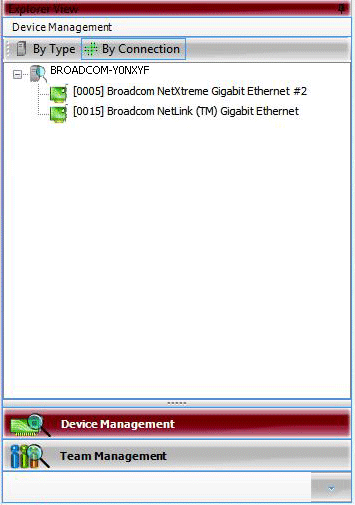
Items in Device Management can be listed by type or by connection.
To list items in Device Management by type
A single hardware device may be using several different drivers, so Device Management breaks each item out into separate categories.
To list items in Device Management by connection
The Connection View lists the server and client devices in a parent/child hierarchy, which makes it easier to see the relationships between the adapters. Just as in the Device Management pane, selecting items in the Connection View shows the options available for that item.
The icon next to each device in the Device Management pane shows its status. An icon next to a device name that appears normal means the device is connected and working.
BACS 3 places an icon in the Windows taskbar when the program is installed. Use the Options window to turn this icon on or off.
To enable or disable the BACS tray icon
The appearance of the BACS 3 interface can be customized.
To change the interface appearance
To reset the interface to the default appearance
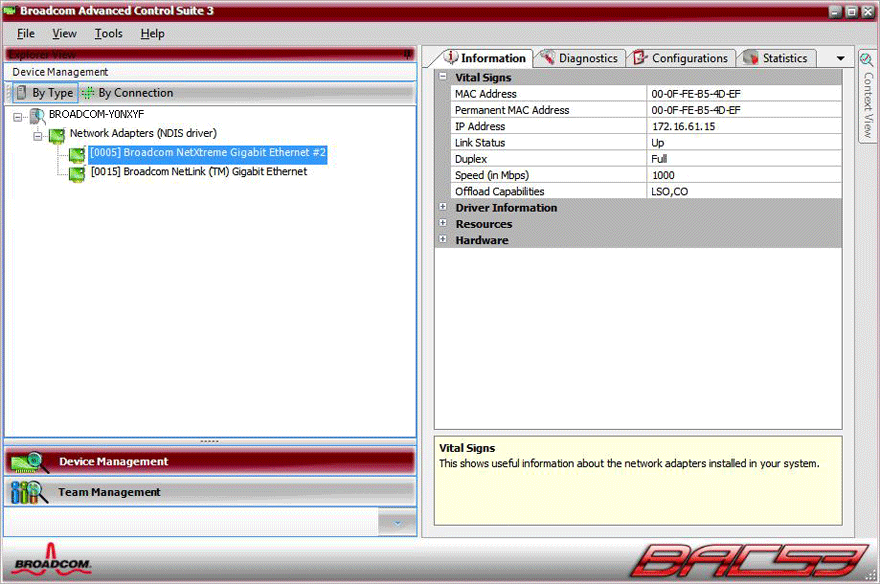
The Vital Signs section of the Information tab has useful information about the network adapters that are installed in your system, such as the link status of the adapter and general network connectivity.
To view Vital Signs information for any installed network adapter, click the name of the adapter listed in the Device Management pane, then click the Information tab.
NOTES:
The unique hardware address assigned to the network adapter.
The network address associated with the adapter. If the IP address is all 0s, the associated driver has not been bound with Internet Protocol (IP).
The status of the network link.
The adapter is operating in the indicated duplex mode.
The link speed of the adapter, in megabits per second.
The offload capabilities supported by the adapter.
The Driver Information section of the Information tab displays data about the driver for the selected network adapter.
To view Driver Information for any installed network adapter, click the name of the adapter listed in the Device Management pane, then click the Information tab.
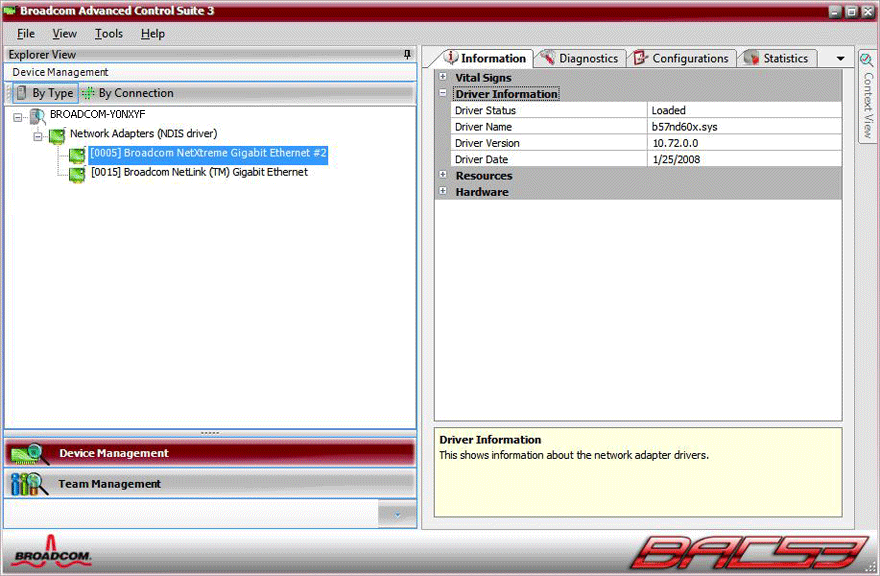
The status of the adapter driver.
The file name of the adapter driver.
The current version of the adapter driver.
The creation date of the adapter driver.
The Resources section of the Information tab displays information about connections and other essential functions for the selected network adapter.
To view Resources for any installed network adapter, click the name of the adapter listed in the Device Management pane, then click the Information tab.
NOTE: Some information may not be available for all Broadcom network adapters.
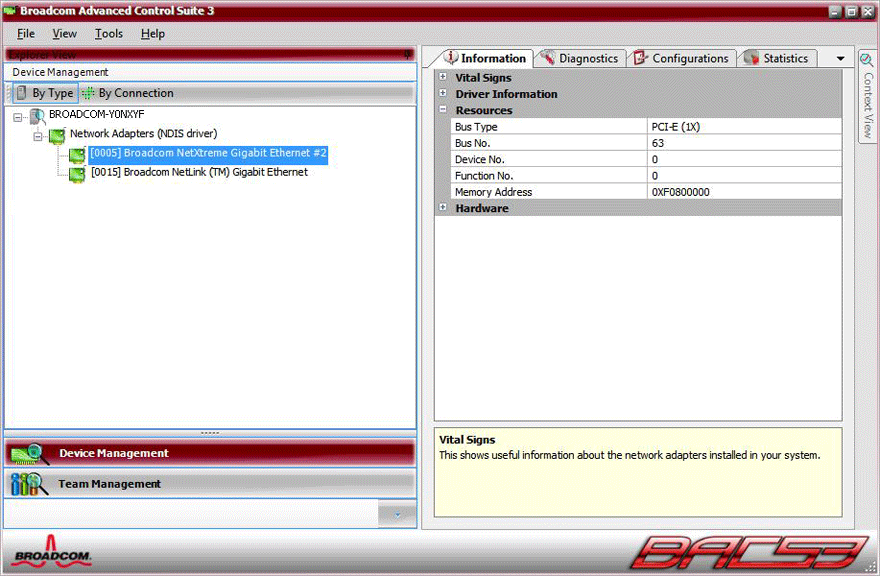
The type of input/output (I/O) interconnect used by the adapter.
The slot number on the system board occupied by the adapter. This item is not available for PCI Express type adapters.
The bus clock signal frequency used by the adapter. This item is not available for PCI Express type adapters.
The number of bits that the bus can transfer at a single time to and from the adapter. This item is not available for PCI Express type adapters.
Indicates the number of the bus where the adapter is installed.
The number assigned to the adapter by the operating system.
The port number of the adapter. For a single-port adapter, the function number is 0. For a two-port adapter, the function number for the first port is 0, and the function number for the second port is 1.
The interrupt line number that is associated with the adapter. Valid numbers range from 2 to 25.
The memory mapped address that is assigned to the adapter. This value can never be 0.
The Hardware section of the Information tab displays information about the hardware settings for the selected network adapter.
To view Hardware for any installed network adapter, click the name of the adapter listed in the Device Management pane, then click the Information tab.
NOTE: Some information may not be available for all Broadcom network adapters.
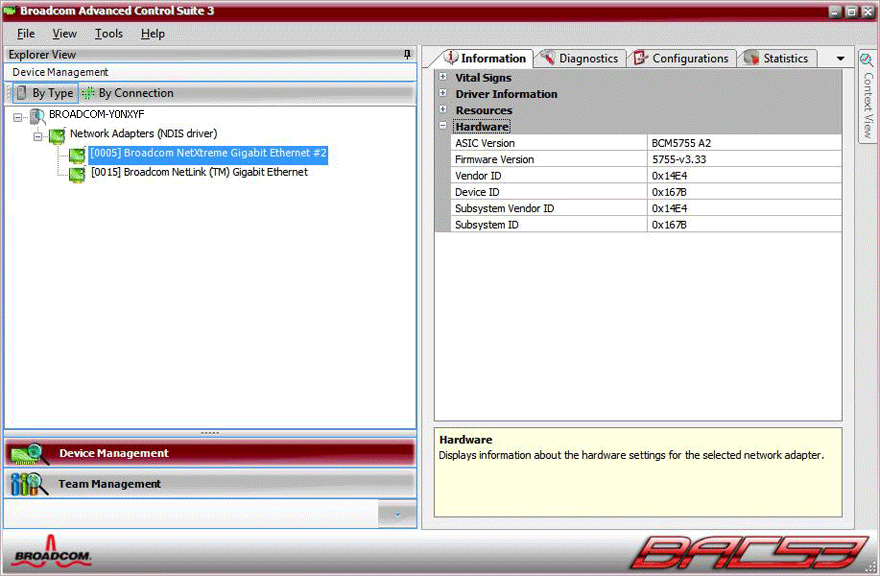
The chip version of the Broadcom adapter (this information is not available for adapters made by others).
The firmware version of the Broadcom adapter (this information is not available for adapters made by others). This information is only available for Broadcom NetXtreme adapters.
The vendor ID.
The adapter ID.
The subsystem vendor ID.
The subsystem ID.
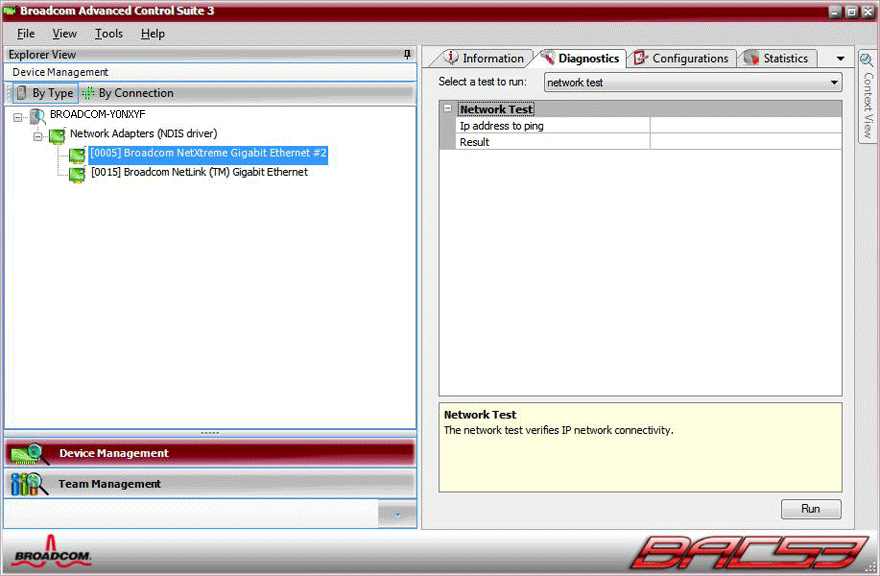
The Network Test option on the Diagnostics tab lets you verify IP network connectivity. This test verifies if the driver is installed correctly and tests connectivity to a gateway or other specified IP address on the same subnet. The network test uses TCP/IP to send ICMP packets to remote systems, then waits for a response.
To run the network test
The results of the network test are displayed in the Result field.
The Diagnostic Tests option on the Diagnostics tab lets you check the state of the physical components on a Broadcom network adapter. You can trigger the tests manually, or choose to have BACS 3 continuously perform them. If the test are performed continuously, then the number of passes and fails in the Status field for each test increments every time the tests are performed. For example, if a test is performed four times and there are no fails, the value in the Status field for that test is 4/0. However, if there were 3 passes and 1 fail, the value in the Status field is 3/1.
NOTES:
To run the diagnostic tests once
To run the diagnostic tests continuously

This test verifies the read and write capabilities of the network adapter registers by writing various values to the registers and verifying the results. The adapter driver uses these registers to perform network functions such as sending and receiving information. A test failure indicates that the adapter may not be working properly.
This test verifies the read and write capabilities of the registers of the physical layer (PHY). The physical layer is used to control the electrical signals on the wire and to configure network speeds such as 1000 Mbit/s.
This test verifies the content of the electrically erasable programmable read-only memory (EEPROM) by reading a portion of the EEPROM and computing the checksum. The test fails if the computed checksum is different from the checksum stored in the EEPROM. An EEPROM image upgrade does not require a code change for this test.
This test verifies that the internal memory of the adapter is functioning properly. The test writes patterned values to the memory and reads back the results. The test fails if an erroneous value is read back. The adapter cannot function if its internal memory is not functioning properly.
This test verifies the operation of the internal CPUs in the adapter.
This test verifies that the Network Device Driver Interface Specification (NDIS) driver is able to receive interrupts from the adapter.
This test verifies that the NDIS driver is able to send packets to and receive packets from the adapter.
This test verifies that the NDIS driver is able to send packets to and receive packets from the adapter.
This test causes all of the port LEDs to blink 5 times for the purpose of identifying the adapter.
The Cable Analysis option on the Diagnostics tab lets you monitor the conditions of each wire pair in an Ethernet Category 5 cable connection within an Ethernet network. The analysis measures the cable quality and compares it against the IEEE 802.3ab specification for compliance.
NOTES:
To run a cable analysis
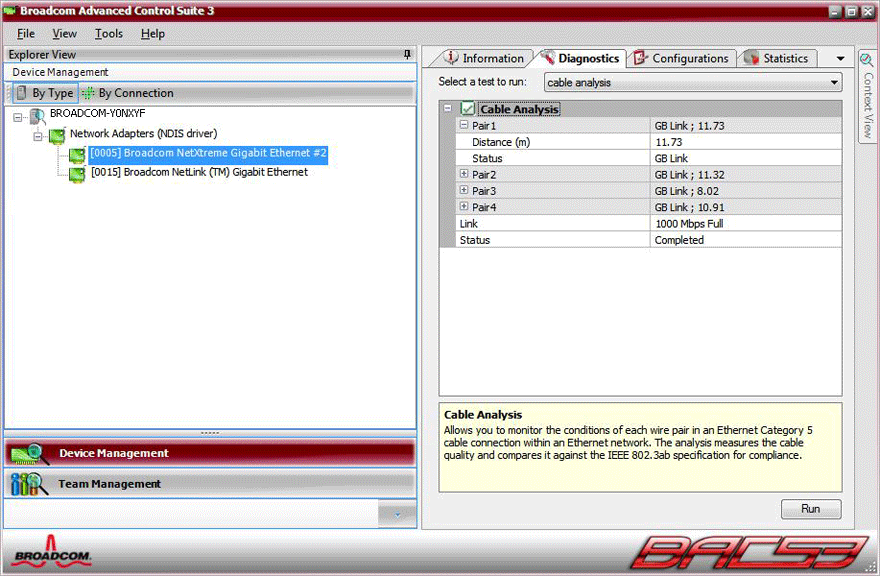
The valid cable distance in meters (except when the Noise result is returned).
This shows the type of link on this cable pair.
The link connection speed and duplex mode.
The status after the test is run, either completed or failed.
There are several factors that could have an effect on the test results:
Advanced on the Configurations tab allow you to view and change the values of the available properties of the selected adapter. The potentially available properties and their respective settings are described below.
NOTES:
To set adapter properties
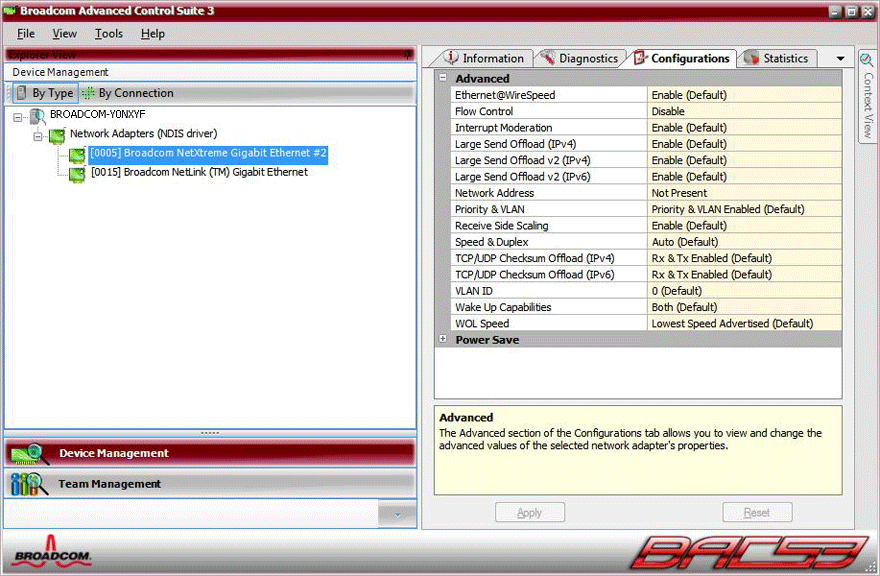
Enables quality of service, which is an Institute of Electrical and Electronics Engineering (IEEE) specification that treats different types of network traffic diversely to ensure required levels or reliability and latency according to the type of traffic. This property is disabled by default. Unless the network infrastructure supports QoS, do not enable this property. Otherwise, problems may occur.
Enables a Gigabit Ethernet adapter to establish a link at a lower speed when only two pairs of wires are available in the cabling plant. The default setting for this property is Enabled.
Enables or disables the receipt or transmission of PAUSE frames. PAUSE frames allow the network adapter and a switch to control the transmit rate. The side that is receiving the PAUSE frame momentarily stops transmitting.
Normally, the checksum function is computed by the protocol stack. When you select one of the Checksum Offload property values (other than None), the checksum can be computed by the network adapter.
Normally, the TCP segmentation is done by the protocol stack. When you enable the Large Send Offload property, the TCP segmentation can be done by the network adapter. The default setting for this property is Enabled.
Enables the network adapter to transmit and receive oversized Ethernet frames that are greater than 1514 bytes, but less than or equal to 9000 bytes in length (9600 bytes for network adapters that operate at 10 Gbps). This property requires the presence of a switch that is able to process jumbo frames.
Frame size is set at 1500 bytes by default. To increase the size of the received frames, raise the byte quantity in 500-byte increments.
Enables the network adapter to transmit and receive oversized Ethernet frames that are greater than 1514 bytes, but less than 9000 bytes in length. This property requires the presence of a switch that is able to process Jumbo frames.
Frame size is set at 1500 bytes by default by selecting the LSO Enabled, Jumbo Off option.
NOTE: Jumbo Frames and Large Send Offload (LSO) are mutually-exclusive properties.
Normally, the TCP segmentation is done by the protocol stack. When you enable the Large Send Offload (LSO) property, the TCP segmentation can be done by the network adapter.
The Locally Administered Address is a user-defined MAC address that is used in place of the MAC address originally assigned to the network adapter. Every adapter in the network must have its own unique MAC address. This locally administered address consists of a 12-digit hexadecimal number.
The appropriate assigned ranges and exceptions for the locally administered address include the following:
Allows configuring network load balancing across multiple CPUs. The default setting for this property is Enabled.
The Speed & Duplex property sets the connection speed and mode to that of the network. Note that Full-Duplex mode allows the adapter to transmit and receive network data simultaneously.
NOTES:
Enables the network adapter to wake up from a low-power mode when it receives a network wake-up frame. Two types of wake-up frames are possible: Magic Packet and Wake Up Frame.
Sets the speed at which the network adapter connects to the network while the network adapter is in Wake on LAN mode. By default, the WOL Speed property is set to Auto.
Normally the TCP segmentation is done by the protocol stack. When you enable the Large Send Offload property, the TCP segmentation can be done by the network adapter.
Allows configuring checksum offload for the IPv4 protocol.
Allows enabling both the prioritization of network traffic and VLAN tagging. VLAN tagging only occurs when the VLAN ID setting is configured with a value other than 0 (zero).
NOTE: If an intermediate driver is managing the network adapter for VLAN tagging, the Priority & VLAN Disabled and Priority Enabled settings should not be used. Use the Priority & VLAN Enabled setting and change the VLAN ID to 0 (zero).
Enables VLAN tagging and configures the VLAN ID when Priority & VLAN Enabled is selected as the Priority & VLAN setting. The range for the VLAN ID is 1 to 4094 and must match the VLAN tag value on the connected switch. A value of 0 (default) in this field disables VLAN tagging.
Risk Assessment of VLAN Tagging through the NDIS Miniport Driver
Broadcom's NDIS 6.0 miniport driver provides the means to allow a system containing a Broadcom adapter to connect to a tagged VLAN. On Windows XP systems, this support was only provided through the use of an intermediate driver (e.g., Broadcom Advanced Server Program - BASP). Unlike BASP, however, the NDIS 6 driver's support for VLAN participation is only for a single VLAN ID.
Also unlike BASP, the NDIS 6.0 driver only provides VLAN tagging of the outbound packet, but does not provide filtering of incoming packets based on VLAN ID membership. This is the default behavior of all miniport drivers. While the lack of filtering packets based on VLAN membership may present a security issue, the following provides a risk assessment based on this driver limitation for an IPv4 network:
A properly configured network that has multiple VLANs should maintain separate IP segments for each VLAN. This is necessary since outbound traffic relies on the routing table to identify which adapter (virtual or physical) to pass traffic through and does not determine which adapter based on VLAN membership.
Since support for VLAN tagging on Broadcom's NDIS 6.0 driver is limited to transmit (Tx) traffic only, there is a risk of inbound traffic (Rx) from a different VLAN being passed up to the operating system. However, based on the premise of a properly configured network above, the IP segmentation and/or the switch VLAN configuration may provide additional filtration to limit the risk.
In a back-to-back connection scenario, two computers on the same IP segment may be able to communicate regardless of their VLAN configuration since no filtration of VLAN membership is occurring. However, this scenario assumes that the security may already be breached since this connection type is not typical in a VLAN environment.
If the risk above is not desirable and filtering of VLAN ID membership is required, then support through an intermediate driver would be necessary.
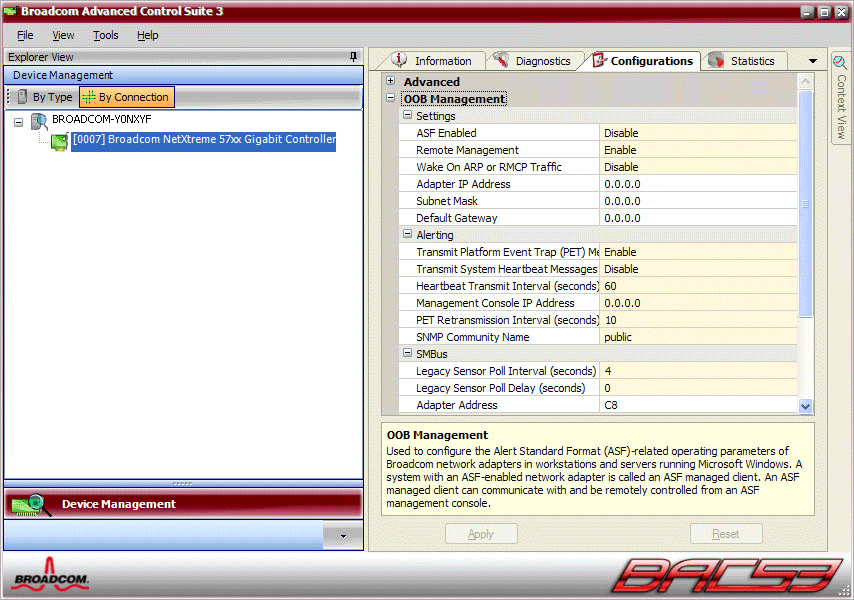
Out of Band (OOB) management enables management of networked computers when their operating system is absent. This includes a networked computer with an inactive or inoperable operating system, or in a low-power system sleep state. A remote management console controls and monitors client systems via a channel separate from the data channel using industry-standard remote management protocols. Capabilities of OOB management includes alerting and remote control.
The OOB Management section of the Configurations tab is used to configure the Alert Standard Format (ASF) and Desktop and mobile Architecture for System Hardware (DASH)-related operating parameters of Broadcom network adapters. A system with an ASF or DASH-enabled network adapter is called an ASF or DASH managed client. ASF and DASH managed clients can communicate with and be remotely controlled from a management console.
NOTES: OOB Management is not available for all Broadcom NetXtreme network adapters.
TruManage™ is a Broadcom technology that integrates DASH and PMCI open client manageability standards and incorporates advanced power management features that enable enterprise-class PC and mobile systems to be fully managed from a management console.
NOTE: TruManage is only available for DASH-enabled Broadcom NetXtreme network adapters.
TruManage supports the following features:
To start OOB Management, select OOB Management from the BACS 3 Configurations tab.
To inspect or configure the basic OOB management operating parameters for a network adapter, select the ASF or DASH-capable network adapter you want to configure, and then click OOB Management from the Configurations tab.
NOTE: Broadcom NetXtreme ASF-enabled network adapters display OOB Management in the Configurations tab. DASH-enabled network adapters display OOB Management in the Configurations tab along with the TruManage logo.

To configure general OOB management settings
Enables the ASF or DASH functionality in the selected network adapter. If there is more than one network adapter in your computer, be sure that you enable ASF or DASH functionality in only one network adapter at a time.
Note: Enabling ASF or DASH functionality in more than one network adapter in a system results in unpredictable behavior.
Enables the network adapter to wake the computer upon receiving ARP or RMCP traffic while the computer is in low-power mode.
NOTE: The Wake on ARP or RMCP Traffic option is not available for DASH-enabled network adapters.
Most Windows PCs today have the capability to conserve power by entering a low-power mode (stand-by, hibernate, or sleep). These computers also have the capability to wake up when an external event occurs. One such external event is when a network adapter receives an interesting packet. Typically, the computer wakes up if a network adapter receives one of the following types of interesting packets:
This Wake on LAN (WOL) behavior conflicts with the way an ASF-enabled network adapter operates. When the computer enters low-power mode, an ASF-enabled network adapter is still operational, sending PET messages and receiving and responding to RMCP messages and ARP requests. Received ARP and RMCP packets are direct-IP packets and would normally wake up the system, but this is not desirable behavior for most ASF or DASH managed clients. By enabling or disabling wake on ARP or RMCP traffic, you can choose whether or not to wake-up the system when the network adapter receives an ARP or RMCP packet. When wake on ARP or RMCP traffic is enabled, the ASF-enabled network adapter attempts to wake up the computer if the network adapter receives an ASF or RMCP packet.
The adapter IP address of the network adapter is displayed next to the Adapter IP Address.
This value is the subnet mask that is applied to network addresses to determine the network segment to be used for routing considerations.
The default gateway value is the network address of the gateway that will be used by the management firmware for packets destined for hosts external to the local network segment.
The displayed values are automatically updated whenever the network adapter IP address, subnet mask, or default gateway is changed via DHCP or manual configuration. The Management Agent, which is a process that runs in the background as a Windows NT service and has no user interface, automatically detects these changes and updates the properties in the ASF Configuration Table in the network adapter nonvolatile memory.
When the management console is located on a different subnet and is connected via a gateway router, the network adapter uses the subnet mask and default gateway values in the ASF Configuration Table to communicate with the management console.
Use this section to configure the IP protocol and IP addresses.
Identifies the IP addressing as either IPv4 Only, IPv6 Only, or IPv4 and IPv6.
If IPv4 is the addressing model. Use this section to configure the IPv4 properties.
If IPv6 is the addressing model, use this section to configure the IPv6 addresses.
Enter the IP address. For IPv4, enter the IP address in dotted-decimal notation. For IPv6, enter the IP address using the following notation: X:X:X:X:X:X:X:X, where `X' represents a hexadecimal number. When this parameter is set to 0.0.0.0, no IPv4 network communications will be supported by the management firmware. When this parameter is set to : :, only the IPv6 link-local address will be used for IPv6 network communications by the management firmware.
Enter the subnet mask value that is to be applied to the network addresses to determine the network segment to be used for routing considerations.
Enter the gateway address.
Enter the IP address of the primary server that will be used by the management firmware for host name lookups via DNS. For IPv4, enter the IP address in dotted-decimal notation. For IPv6, enter the IP address using the following notation: X:X:X:X:X:X:X:X, where `X' represents a hexadecimal number.
Enter the IP address of the secondary server that will be used by the management firmware for host name lookups via DNS. For IPv4, enter the IP address in dotted-decimal notation. For IPv6, enter the IP address using the following notation: X:X:X:X:X:X:X:X, where `X' represents a hexadecimal number.
Enables the use of a DHCP server when the host operating system network driver is not loaded. When this parameter is enabled and the operating system network driver is not loaded, the management firmware will perform DHCP network configuration negotiations and renewals.
If IPv6 is the addressing model, use this section to configure the IPv6 addresses.
Enter the subnet prefix length, in bits, for the IPv6 network address to determine the network segment to be used for IPv6 routing considerations. This value is typically 64 for IPv6. Do not use a forward slash with the subnet prefix length value.
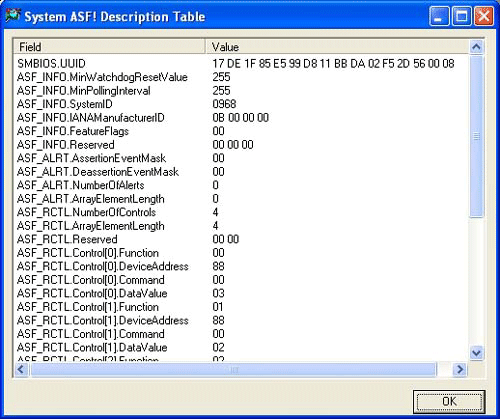
The System ASF! Description Table defines the ASF-related capabilities and operating parameters of the computer, as defined by the computer manufacturer. This table is stored as an ACPI System Description Table in the computer firmware nonvolatile memory. The Broadcom ASF Configuration Utility automatically imports this table into the nonvolatile memory of each ASF-enabled network adapter.
To view the System ASF! Description Table, click Tools from BACS 3 and then select View ASF!.
Alerting provides system health information and error notification in low-power and operating-system-absent states, as well as during normal operation to a remote management console. The parameters in the Alerting section of OOB Management are used to configure the settings related to SNMP platform event trap (PET) messages.
Enables the network adapter to transmit PET messages when this parameter is set to Enabled and the Destination Address parameter contains a valid IP address or host name. When this parameter is set to Disabled, PETs will not be transmitted and the remaining configuration parameters in this section will have no effect.
When this paramter is set to Enabled and the Pet Heartbeat Interval parameter is non-zero, the management firmware will attempt to transmit periodic System Heartbeat PETs at the configured PET Heart Interval.
Identify the addressing model of the management console.
Type the IP address of the remote management console in the Management Console Address box to specify the IP address of the remote management console. An ASF or DASH-enabled network adapter sends all PET messages to this IP address. The management console IP address is usually statically assigned and is seldom changed. If the management console IP address is changed, type the new IP address in the Management Console Address box.
Type the desired time interval in the Heartbeat Transmit Interval box to specify the time interval (in seconds) at which system heartbeat messages are sent.
Type the desired community name in the SNMP Community Name box to specify the SNMP community name that is included in transmitted PET messages. The default SNMP community name is public.
Type the desired time interval in the PET Retransmission Interval box to specify the time interval (in seconds) between retransmissions of a PET message. According to the ASF standard, each PET message (except the system heartbeat message) must be retransmitted three times to ensure successful delivery to the ASF management console. The default PET retransmission interval is 10 seconds.
The remote management console can query an ASF or DASH-enabled client for capabilities and system presence or state information. On request, a client system will return the ASF feature set of the requested system. The properties in the Remote Management (RMCP) section are used to configure the settings related to secure remote management.
Enables the management firmware to listen for incoming RMCP and/or Secure RMCP (RSP) requests based on the other parameters in this section.
A management console uses RMCP messages to communicate with an ASF or DASH managed client. When remote management is enabled, the network adapter acknowledges and responds to the following RMCP message types:
If secure management is also enabled, the network adapter acknowledges and responds to the following secure RMCP message types:
If allowed by the remote control capabilities and security profile for the network adapter, the following operations can be performed remotely:
When remote management is disabled, the network adapter does not acknowledge or respond to RMCP messages.
Enables presence ping as the only RMCP method to test the connection between the DASH-enabled adapter and the management console.
Enter the destination port in decimal notation. By default, the RMCP server communicates on port 623.
Enables the network adapter to receive and respond to secure Remote Management Control Protocol (RMCP) messages on UDP port 298h (664 decimal).
Enter the destination port in decimal notation. By default, the RMCP secure server communicates on port 624.
Enables the network adapter to receive and respond to insecure RMCP (ASF 1.0) messages on UDP port 26Fh (623 decimal). If Secure RMCP Support (ASF 2.0) is disabled, the network adapter automatically operates in ASF 1.0 compatibility mode, regardless of the setting for ASF 1.0 Compatibility.
The value in the Data Integrity Key box is the shared secret key used for key generation operations (KG). Type the key in the Data Integrity Key box. If the generation key is in hexadecimal notation, select the (hex) check box.
There are two types of authenticated user roles: Operator and Administrator. KO is the associated authentication key for Operator, and this parameter value is the 160-bit key used by the RSP Session Protocol (RSSP) when authenticating a remote management console requesting a secure RMCP session using the Operator role. Type the authentication key in the Authentication Key box. If the authentication key is in hexadecimal notation, select the (hex) check box. Possible values are 20 ASCII characters or 40 hexadecimal digits.
There are two types of authenticated user roles: Operator and Administrator. KA is the associated authentication key for Administrator, and this parameter value is the 160-bit key used by the RSP Session Protocol (RSSP) when authenticating a remote management console requesting a Secure RMCP session using the Administrator role. Type the authentication key in the Authentication Key box. If the authentication key is in hexadecimal notation, select the (hex) check box. Possible values include up to 20 ASCII characters or 40 hexadecimal digits.
Note: Each security key (generation key, authentication key) may be typed as a set of up to 20 ASCII characters or as a set of hexadecimal bytes with each byte represented by 2 hexadecimal digits (0–F), with a maximum total length of 40 hexadecimal digits (20 bytes).
Both Operator and Administrator roles also have an associated set of rights that determines which RMCP Remote Control commands it has the right to execute on the managed client. These Remote Control commands include:
To assign rights to an authenticated operator or administrator, select the appropriate check boxes in the Rights section.
Web Services (WS) Management is a DMTF specification that delivers standards-based web services management for DASH-enabled clients. Both HTTP and HTTPS protocols are supported.
This parameter determines whether or not HTTP communications will be supported by the management firmware. Both WS Management/HTTP (for DASH Class A Security) and the web browser/GUI interface (over HTTP) depend on this parameter being set to Enabled.
This parameter determines the TCP port number on which the management firmware will listen for incoming HTTP connections. This port will be used both for incoming WS Management/HTTP and web browser/GUI (over HTTP) requests.
This parameter determines whether or not HTTPS communications will be supported by the management firmware. Both WS Management/HTTPS (for DASH Class B Security) and the web browser/GUI interface (over HTTPS) depend on this parameter being set to Enabled. HTTPS support also depends on the Private RSA Key and TLS Server Certificate records containing valid data.
Enter the destination port in decimal notation on which the management firmware will listen for incoming HTTPS connections. This port will be used both for incoming WS Management/HTTPS and web browser/GUI (over HTTPS) requests.
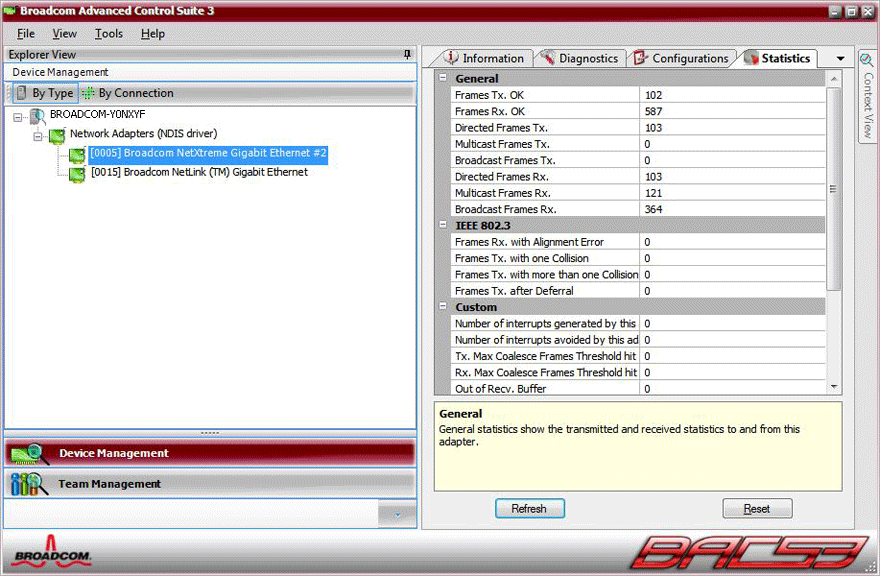
The information provided on the Statistics tab allows you to view traffic statistics for both Broadcom network adapters and network adapters made by others. Statistical information and coverage are more comprehensive for Broadcom adapters.
To view Statistics information for any installed network adapter, click the name of the adapter listed in the Device Management pane, then click the Statistics tab.
Click Refresh to get the most recent values for each statistic. Click Reset to change all values to zero.
NOTES:
General Statistics show the transmitted and received statistics to and from the adapter.
A count of the frames that were successfully transmitted. This counter is incremented when the transmit status is reported as Transmit OK.
A count of the frames that were successfully received. This does not include frames received with frame-too-long, frame check sequence (FCS), length, or alignment errors, nor frames lost due to internal MAC sublayer errors. This counter is incremented when the receive status is reported as Receive OK.
A count of directed data frames that were successfully transmitted.
A count of frames that were successfully transmitted (as indicated by the status value Transmit OK) to a group destination address other than a broadcast address.
A count of frames that were successfully transmitted (as indicated by the transmit status Transmit OK) to the broadcast address. Frames transmitted to multicast addresses are not broadcast frames and are excluded.
A count of directed data frames that were successfully received.
A count of frames that were successfully received and are directed to an active nonbroadcast group address. This does not include frames received with frame-too-long, FCS, length, or alignment errors, nor frames lost because of internal MAC sublayer errors. This counter is incremented as indicated by the Receive OK status.
A count of frames that were successfully received and are directed to a broadcast group address. This count does not include frames received with frame-too-long, FCS, length, or alignment errors, nor frames lost because of internal MAC sublayer errors. This counter is incremented as indicated by the Receive OK status.
The number of frames received with CRC errors.
The IEEE 802.3 statistics show transmit and receive error information.
A count of the frames that were not an integral number of octets in length and do not pass the FCS check. This counter is incremented when the receive status is reported as Alignment Error.
A count of the frames that were involved in a single collision and were subsequently transmitted successfully. This counter is incremented when the result of a transmission is reported as Transmit OK, and the attempt value is 2.
A count of the frames that were involved in more than one collision and were subsequently transmitted successfully. This counter is incremented when the transmit status is reported as Transmit OK, and the value of the attempts variable is greater than 2 and less than or equal to the attempt limit.
A count of the frames that were delayed being transmitted on the first attempt because the medium was busy. The frames involved in any collision are not counted.
Custom statistics are available only for an enabled Broadcom network adapter.
The number of frames with a size less than 64 bytes with bad frame check sequence (FCS).
MAC control frames with the pause command and a length equal to 0.
MAC control frames with the pause command and a length greater than 0.
MAC control frames with no pause command.
MAC Transmit with X-on was on.
MAC Transmit with X-on was off.
The number of times the adapter was requested to transmit a packet performing TCP segmentation.
The total number of offloaded TCP connections.